HTML Comments

Please Share On:

HTML comments are ignored by the browser while displaying your web pages. It is good practice to add comments to your complex documents to indicate the sections of a document. Comments help you and others to understand your code.

Comments are used to indicate what the following code does.

Syntax:

<!-- Write your comments Here -->

Comments start with opening tag <!- – and closing tag – ->. Any texts written in between the opening and closing tag are ignored by the browser.
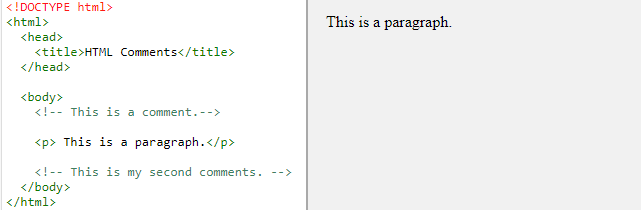
Code:

<!DOCTYPE html>
<html>
  <head>
    <title>HTML Comments</title>
  </head>
 
  <body>
    <!-- This is a comment.-->
    
    <p> This is a paragraph.</p>
    
    <!-- This is my second comments. -->
  </body>
</html>   

Output:

Inline Content Comments

Comments can be used to hide the parts of your content.

Syntax:

<p> Some Text ... <!-- Inline Comment Here --> Remaining Text. </p>

Example:

<!DOCTYPE html>
<html>
  <head>
    <title>HTML Comments</title>
  </head>
 
  <body>
    <p>Comments help you and others to understand 
      your code.<!--Inline Comments --> Comments can be used to 
      hide the parts of your content.</p>
  </body>
</html>

Output:

Multiline Comments:

We have seen single-line comments. But don’t get confused. The HTML supports multi-line comments as well.

Syntax:

<!-- Some Comment 1.
      Some Comment 2,
      Some Comment 3 etc -->

Code:

<!DOCTYPE html>
<html>
  <head>
    <title>HTML Multiline Comments</title>
  </head>
 
  <body>
    <!-- Comments start Here,
         but don't get confused
         HTML supports multiline comments.
         This is a multiline comments.-->
    
    <p> Document content goes here</p>
    
  </body>
</html>    		           

Output:


You may be interested in the following topics:

HTML Styles

Please Share On:
  • The HTML style attribute is used to add styles in an element. For example: color, size, font, and more.
  • The style attribute is used to specify CSS rules within the tag element.
<p style = "font-family: aerial; color: red; font-size: 20px; font-style: italic;"> Some text... </p>

Syntax:

<tagname style="property:value;"> 

Here, The property is a CSS property and the value is a CSS value.

Code:

<!DOCTYPE html>
<html>
  <head>
    <title>HTML Style</title>
  </head>
 
  <body>
     <p style = "color:red; font-size:24px;" > Hello, World! </p>
  </body>
</html> 			    

Output:

3 ways of using CSS in html documents:

  1. External Style Sheet: Define style sheet rules in a seperate .css file and then include that file in your HTML document using <link> tag.
  2. Internal Style Sheet: Define style sheet rules in header section of the HTML document using <style> tag.
  3. Inline Style Sheet: Define style sheet rules directly in the HTML elements using style attribute.

1) External Style Sheet:

In external style sheets, CSS defines as a separate file and saved on a .css extension like “filename.css”. This single .css file will change the look of the entire website. Each page of your website must link to external style sheets using the following code which must insert in the head section.

<head>
<link rel="stylesheet" type="text/css" href="filename.css">
</head>

External style sheets can be written in any text editor. Here is an example of the external style sheets “filename.css” code.

body {
  background-color: blue;
  margin: 10px;
  padding: 5px;
}

.header-title {
  color: black;
  text-align: center;
  text-decoration: underline;
}

2) Internal Style Sheets

Internal Style Sheets may be used to style each single page. It is defined with <style> element inside <head> section of your html page.

<head>
<style>
body {
  background-color: blue;
  margin: 10px;
  padding: 5px;
}

.header-title {
  color: black;
  text-align: center;
  text-decoration: underline;
}
</style>
</head>

3) Inline style sheets

Inline style sheets are used to style a single element.

Suppose you have an HTML page like home.html.

<!DOCTYPE html>
<html>
<head>
  <title>Home Page</tilte>
</head>
<body>
   <h1>This is a heading</h1>
     <p>This is a paragraph.</p>
</body>
</html>

Now define your element using inline style sheets.

<html>
<head>
  <title>Home Page</tilte>
</head>
<body>
   <h1 style="color:red;margin:10px; text-align:center;">This is a heading</h1>
     <p>This is a paragraph.</p>
</body>
</html>

The above code:

<h1 style="color:red;margin:10px; text-align:center;">This is a heading</h1>

is used for the inline style sheet. “This is a heading” is defined with color: red, margin is equal to 10px and text is in the center. The inline style sheets used only in <h1> will not apply in <p>. The content inside the <p> remains the same without any style sheets.

In this way, we can style our webpage layout in 3 different ways.


You may be interested in the following topics:

HTML Paragraph

Please Share On:
  • As everyone knows that a paragraph always starts with new lines and usually a combination of texts.
  • HTML <p> element defines a paragraph. It has both opening and closing tag <p> </p>.
  • Browser automatically add a margin before and after a paragraph.

Syntax:

<p> Some Text... </p>

Code:

<!DOCTYPE html>
<html>
  <head>
    <title>HTML Headings</title>
  </head>
 
  <body>
     <p> I am a first paragraph. </p>
     <p> I am a second paragraph. </p>
     <p> I am a third paragraph. </p>
  </body>
</html> 			
                    

Output:

Browser Display:

As already mentioned above, the <p> tag adds a space before and after a paragraph, which is basically a margin added by your browser. The browser will remove extra spaces and lines when the page is displayed.

In the below example, the paragraph has been defined as using extra spaces and lines. Let’s see the browser output.

Code:

<!DOCTYPE html>
<html>
  <head>
    <title>HTML Headings</title>
  </head>
 
  <body>
    <p> Here, this first paragraph 
      has multiple lines,
      but the browser
      will ignore
      the multiple lines   
    </p>
    
     <p> Here,          this second         paragraph 
      contains          lot of space          in the source code,
      but           the browser
      ignore   spaces 
      to display.   
    </p>
  </body>
</html>  

Output:

HTML Horizontal Line:

<hr> tag is used to display a horizontal line.

<hr> tag is an empty tag, which means it doesn’t need a closing tag.

<hr> element is used to separate content in a webpage.

Syntax:

<hr>

Code:

<!DOCTYPE html>
<html>
  <head>
    <title>HTML Headings</title>
  </head>
 
  <body>
    <h1> Australia </h1>
    <p> Some description about Australia.</p>
    <hr>
    
    <h1> Nepal </h1>
    <p> Some description about Nepal.</p>
    <hr>
    
  </body>
</html> 			        

Output:

HTML Break Line

<br> element is used to break a line.

<br> tag is an empty tag, which means it doesn’t need a closing tag.

You just add a <br> tag whenever you need a line break.

Syntax:

<br>

Code:

<!DOCTYPE html>
<html>
  <head>
    <title>HTML Headings</title>
  </head>
 
  <body>
    <h1> Line Break Example</h1>
    
    <h3>Paragraph without break tag</h3>
    <p>This is a paragraph which uses a line break html tag element. </p>
    
    <br>
    
    <h3> Paragraph with break tag</h3>
    <p>This is a paragraph <br> which uses a line break <br> html tag element.</p>
    
  </body>
</html>

Output:

HTML <pre> Tag:

  • So we have learned how paragraph <p> tag ignores all extra lines and spaces before displaying in a browser. But, there is a way to preserve this by using a <pre> tag.
  • <pre> tag contains an opening and closing tag.
<pre> Some Text... </pre>
  • It displays a text with extra lines and spaces we use.
  • The best example to use <pre> tag is on song’s lyrics. which are written into multiple lines.

Syntax:

<pre> 

Some Text... 

</pre>

Code:

<!DOCTYPE html>
<html>
  <head>
    <title>HTML Headings</title>
  </head>
 
  <body>
    <pre>
      This paragraph has multiple
      lines and it is displayed
      as it is written in the 
      code.
    </pre>
    
    <pre>
      This paragraph      has multiple
      spaces      and it is         displayed
      as it is      written in the 
      code.
    </pre>
    
  </body>
</html>          

Output:


You may be interested in the following topics:

HTML Headings

Please Share On:

HTML headings are titles and sub-titles that you use in your web pages.

There are 6 styles of HTML headings tags starting from <h1> to <h6>.

<h1> defines the most important heading. <h1> heading is used for the main titles of the pages.

<h2> heading mostly used for sub-titles.

<h6> defines the least important heading.

Syntax:

<h1>Heading 1</h1>
<h2>Heading 2</h2>
<h3>Heading 3</h3>
<h4>Heading 4</h4>
<h5>Heading 5</h5>
<h6>Heading 6</h6>

Code:

<!DOCTYPE html>
<html>
  <head>
    <title>HTML Headings</title>
  </head>
 
  <body>
    <p> List of Heading tag starting from &lt; h1 &gt; to &lt; h6 &gt;
    </p>
    <h1>Heading 1</h1>
    <h2>Heading 2</h2>
    <h3>Heading 3</h3>
    <h4>Heading 4</h4>
    <h5>Heading 5</h5>
    <h6>Heading 6</h6>

  </body>
</html>                
						

Output:


You may be interested in the following topics:

Copyright @2023. All Right Reserved.


Social media & sharing icons powered by UltimatelySocial