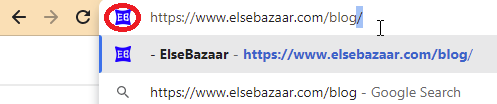
A favicon is a small icon displayed next to your page title in your browser. You can use any image you like but the image should be in high contrast for better results.
Favicon image always displays before your web page title. You can see a screenshot below that red highlighted circle mark is a favicon image.
How to add a Favicon image to your webpage?
First of all, save your favicon image to the root directory of your webserver or create a folder in the root directory named “images” and keep your favicon image in that folder. A common name for a favicon image is favicon.ico.
Second, now is the time to link your favicon image to your page. So, add the <link> element to your HTML documents after the <title> element and give a reference to your favicon.ico folder.
See an example below:
<!DOCTYPE html>
<html>
<head>
  <title>Home Page</title>
  <link rel="icon" type="image/x-icon" href="/images/favicon.ico">
</head>
<body>

<h1>This is a home page</h1>
<p>This is a home page paragraph.</p>

</body>
</html>
Now save your HTML documents and reload your browser. You should be able to see your favicon icon.
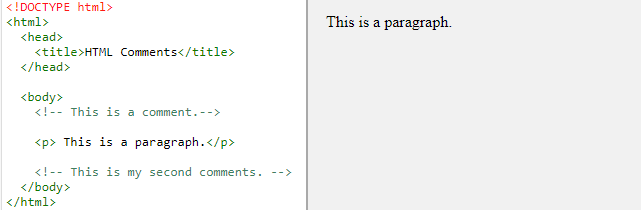
HTML comments are ignored by the browser while displaying your web pages. It is good practice to add comments to your complex documents to indicate the sections of a document. Comments help you and others to understand your code.
Comments are used to indicate what the following code does.
Syntax:
<!-- Write your comments Here -->
Comments start with opening tag <!- – and closing tag – ->. Any texts written in between the opening and closing tag are ignored by the browser.
Code:
<!DOCTYPE html>
<html>
  <head>
    <title>HTML Comments</title>
  </head>

  <body>
    <!-- This is a comment.-->

    <p> This is a paragraph.</p>

    <!-- This is my second comments. -->
  </body>
</html>
Comments can be used to hide the parts of your content.
Syntax:
<p> Some Text ... <!-- Inline Comment Here --> Remaining Text. </p>
Example:
<!DOCTYPE html>
<html>
  <head>
    <title>HTML Comments</title>
  </head>

  <body>
    <p>Comments help you and others to understand
      your code.<!--Inline Comments --> Comments can be used to
      hide the parts of your content.</p>
  </body>
</html>
When you write content, you need some text to look more special than other text like bold, italic, underlining, and so on. This element for defining text with special meaning is HTML formatting.
HTML Formatting Elements:
Below are the list of HTML formatting elements:
<b> – Bold Text
<i> – Italic Text
<strong> – Important Text
<u> – Underline Text
<em> – Emphasized Text
<mark> – Marked Text
<small> – Smaller Text
<big> – Larger Text
<del> – Deleted Text
<ins> – Inserted Text
<sub> – Subscript Text
<sup> – Superscript Text
<strike> – Strike Text
<tt> – Monospaced Font
1) <b> – Bold Text
The <b> element has opening and closing tag. <b> … </b>. Any texts that appears between opening <b> tag and closing </b> tag is shown in bold texts.
Syntax:
<b> ... </b>
Code:
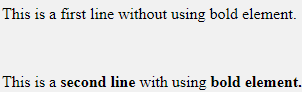
<!DOCTYPE html>
<html>
  <head>
    <title>Bold Text</title>
  </head>

  <body>
     <p> This is a first line without using bold element. </p>
    <br/>
    <p>
      This is a <b>second line</b> with using <b>bold element.</b>
    </p>

  </body>
</html>
External Style Sheet:Define style sheet rules in a seperate .css file and then include that file in your HTML document using <link> tag.
Internal Style Sheet: Define style sheet rules in header section of the HTML document using <style> tag.
Inline Style Sheet: Define style sheet rules directly in the HTML elements using style attribute.
1) External Style Sheet:
In external style sheets, CSS defines as a separate file and saved on a .css extension like “filename.css”. This single .css file will change the look of the entire website. Each page of your website must link to external style sheets using the following code which must insert in the head section.
Inline style sheets are used to style a single element.
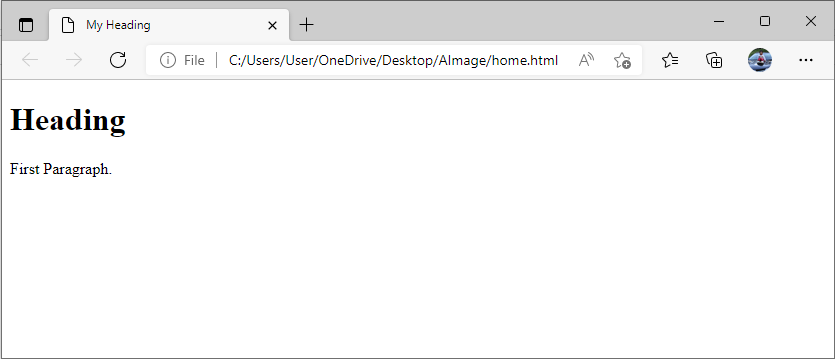
Suppose you have an HTML page like home.html.
<!DOCTYPE html>
<html>
<head>
  <title>Home Page</tilte>
</head>
<body>
   <h1>This is a heading</h1>
     <p>This is a paragraph.</p>
</body>
</html>
Now define your element using inline style sheets.
<html>
<head>
  <title>Home Page</tilte>
</head>
<body>
   <h1 style="color:red;margin:10px; text-align:center;">This is a heading</h1>
     <p>This is a paragraph.</p>
</body>
</html>
The above code:
<h1 style="color:red;margin:10px; text-align:center;">This is a heading</h1>
is used for the inline style sheet. “This is a heading” is defined with color: red, margin is equal to 10px and text is in the center. The inline style sheets used only in <h1> will not apply in <p>. The content inside the <p> remains the same without any style sheets.
In this way, we can style our webpage layout in 3 different ways.
As everyone knows that a paragraph always starts with new lines and usually a combination of texts.
HTML <p> element defines a paragraph. It has both opening and closing tag <p> </p>.
Browser automatically add a margin before and after a paragraph.
Syntax:
<p> Some Text... </p>
Code:
<!DOCTYPE html>
<html>
<head>
<title>HTML Headings</title>
</head>
<body>
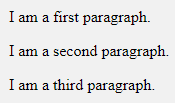
<p> I am a first paragraph. </p>
<p> I am a second paragraph. </p>
<p> I am a third paragraph. </p>
</body>
</html>
As already mentioned above, the <p> tag adds a space before and after a paragraph, which is basically a margin added by your browser. The browser will remove extra spaces and lines when the page is displayed.
In the below example, the paragraph has been defined as using extra spaces and lines. Let’s see the browser output.
Code:
<!DOCTYPE html>
<html>
  <head>
    <title>HTML Headings</title>
  </head>

  <body>
    <p> Here, this first paragraph
      has multiple lines,
      but the browser
      will ignore
      the multiple lines
    </p>

     <p> Here,          this second         paragraph
      contains          lot of space          in the source code,
      but           the browser
      ignore   spaces
      to display.
    </p>
  </body>
</html>
<br> tag is an empty tag, which means it doesn’t need a closing tag.
You just add a <br> tag whenever you need a line break.
Syntax:
<br>
Code:
<!DOCTYPE html>
<html>
<head>
<title>HTML Headings</title>
</head>
<body>
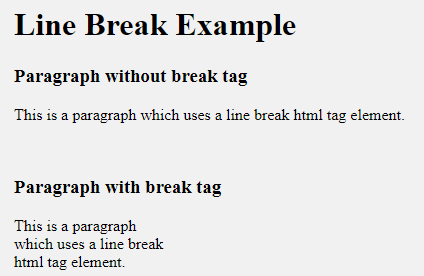
<h1> Line Break Example</h1>
<h3>Paragraph without break tag</h3>
<p>This is a paragraph which uses a line break html tag element. </p>
<br>
<h3> Paragraph with break tag</h3>
<p>This is a paragraph <br> which uses a line break <br> html tag element.</p>
</body>
</html>
So we have learned how paragraph <p> tag ignores all extra lines and spaces before displaying in a browser. But, there is a way to preserve this by using a <pre> tag.
<pre> tag contains an opening and closing tag.
<pre>

Some Text...

</pre>
It displays a text with extra lines and spaces we use.
The best example to use <pre> tag is on song’s lyrics. which are written into multiple lines.
Syntax:
<pre>
Some Text...
</pre>
Code:
<!DOCTYPE html>
<html>
  <head>
    <title>HTML Headings</title>
  </head>

  <body>
    <pre>
      This paragraph has multiple
      lines and it is displayed
      as it is written in the
      code.
    </pre>

    <pre>
      This paragraph      has multiple
      spaces      and it is         displayed
      as it is      written in the
      code.
    </pre>

  </body>
</html>
HTML attributes provides the characteristics of HTML elements.
HTML attributes always defines in the HTML opening tag.
HTML attribues has two parts: a name and a value and it’s defines in the following syntax:
<p name = "value"></p>
Here, <p> is a HTML tag.
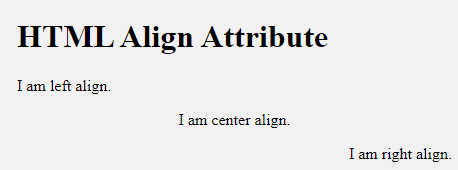
The name is the property that you want to set. Let’s use an alignproperty in <p> tag. So, you will write like this
<p align ="value"> This is just an example of attribute. </p>
The value is the value of the above property and is always kept inside the quotation mark. The above property has three possible values: left, right and center. Let’s use one of these. Now, your HTML code will look like
<p align ="left"> This is just an example of attribute. </p>
Example:
<!DOCTYPE html>
<html>
  <head>
    <title>HTML Align Attribute</title>
  </head>

  <body>
    <h1>HTML Align Attribute</h1>
    <p align = "left" >I am left align.</p>
    <p align = "center" >I am center align.</p>
    <p align = "right" >I am right align.</p>
  </body>
</html>
Note: Always write the attribute name in lowercase.
href Attribute
srcAttribute
altAttriubute
heightand width Attribute
id Attribute
title Attribute
class Attribute
style Attribute
lang Attribute
1) href Attribute:
Syntax:
<a href = "tryityourself.html"> Try it yourself <a>
Here, <a> the tag refers to a hyperlink and href attributes that specify the URL of the link.
Code:
<!DOCTYPE html>
<html>
  <head>
    <title>href Attributes</title>
  </head>

  <body>
    <h1>href Attributes</h1>
    <p align = "center">Click the below link to see how href attribute works upon clicking on the hyperlink text.</p>
    <p align = "center">
         <a href = "https://www.elsebazaar.com/blog/html-attributes/">Visit Elsebazaar's blog for tutorials.</a>
    </p>

  </body>
</html>
An HTML element is defined by starting tag, some contents in the middle, and the closing tag.
Some Examples:
Start Tag
Content
End Tag
<h1>
This is heading 1 content
</h1>
<title>
This is a title content
</title>
<p>
This is a paragraph content
</p>
<br/>
none
none
In the above table, you can see that HTML content begins with start and end tag. For example: <h1> … </h1>, <title> … </title>, <p>…</p>. Some HTML elements don’t need closing tag like <br />, <img… />, <hr />. These elements are called void elements.
Nested HTML Elements:
You are allowed to use one HTML element inside another HTML element. An HTML documents contain nested HTML elements.
The below example contains the following elements <html>, <head>, <title>, <body>, <h1>, and <p>.
You can see that the elements are used inside other elements. These are called nested elements. <html> is the root elements.
An HTML document starts with root element <html>, which has start tag <html> and end tag </html>. Inside the <html> element, there are <head> element and <body> element.
Let first go through <head> element . An <head> element consist of another element <title> with its contents and closing tag. Inside the <title> tag, you will write the document title.
<body> element is nested by another two elements <h1> and <p>. <h1> elements is used to write the heading of the document and <p> element is used for the document paragraph.