How do I create a Toolbar in Android Studio?

Please Share On:

In this tutorial, I am going to show you how can you show a toolbar menu in Android. First, you need to understand the toolbar.

Toolbar is a ViewGroup that can be placed anywhere in your layout. By default, Android uses an action bar. You need to replace the action bar with a toolbar to use a toolbar.

You can easily replace Actionbar into Toolbar by using setSupportActionBar() method. The below code helps to replace ActionBar into ToolBar.

Toolbar mToolbar = (Toolbar) findViewById(R.id.toolbar);
setSupportActionBar(mToolbar);

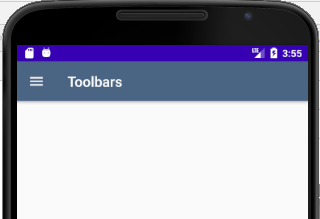
See an image below. I am going to show you how you can achieve this type of toolbar output.

Let start from the beginning to create toolbar into Action bar.

Step 1: Add support library

To use the Toolbar you need to add supporting dependencies in your app’s build.gradle file.

Android -> Gradle Scripts -> build.gradle (Module:app)

implementation 'com.google.android.material:material:1.2.1' //design support library for AndroidX

Step 2: Change App Theme ActionBar

Here, you have to disable your App Theme ActionBar from your style.xml resource file.

Your style.xml resource file before disable AppTheme ActionBar

<resources>
    <!-- Base application theme. -->
    <style name="AppTheme" parent="Theme.AppCompat.Light.DarkActionBar">
        <!-- Customize your theme here. -->
        <item name="colorPrimary">@color/colorPrimary</item>
        <item name="colorPrimaryDark">@color/colorPrimaryDark</item>
        <item name="colorAccent">@color/colorAccent</item>
    </style>

    <style name="AppTheme.NoActionBar">
        <item name="windowActionBar">false</item>
        <item name="windowNoTitle">true</item>
        <item name="android:statusBarColor">@android:color/transparent</item>

    </style>
</resources>

After disable your style.xml App theme ActionBar

<resources>
    <!-- Base application theme. -->
    <style name="AppTheme" parent="Theme.AppCompat.Light.NoActionBar">
        <!-- Customize your theme here. -->
        <item name="colorPrimary">@color/colorPrimary</item>
        <item name="colorPrimaryDark">@color/colorPrimaryDark</item>
        <item name="colorAccent">@color/colorAccent</item>
    </style>

    <style name="AppTheme.NoActionBar">
        <item name="windowActionBar">false</item>
        <item name="windowNoTitle">true</item>
        <item name="android:statusBarColor">@android:color/transparent</item>

    </style>
</resources>

Step 3: Design your Toolbar with icon and Toolbar title

Create a xml file and named as toolbar.xml. And add a menu icon and toolbar title “Toolbar”.

<?xml version="1.0" encoding="utf-8"?>
<androidx.drawerlayout.widget.DrawerLayout xmlns:android="http://schemas.android.com/apk/res/android"
    xmlns:app="http://schemas.android.com/apk/res-auto"
    xmlns:tools="http://schemas.android.com/tools"
    android:id="@+id/drawer_layout"
    android:layout_width="match_parent"
    android:layout_height="match_parent"
    android:fitsSystemWindows="true"
    tools:openDrawer="start">

        <LinearLayout
            android:layout_width="match_parent"
            android:layout_height="match_parent"
            android:orientation="horizontal">

        <androidx.appcompat.widget.Toolbar
            android:id="@+id/toolbar"
            android:layout_width="match_parent"
            android:layout_height="?attr/actionBarSize"
            android:background="@color/blue"
            android:elevation="4dp"
            android:theme="@style/ThemeOverlay.AppCompat.Dark.ActionBar"
            app:popupTheme="@style/ThemeOverlay.AppCompat.Light"
            app:navigationIcon="@drawable/ic_baseline_menu_24"
            app:title="Toolbar"/>
        </LinearLayout>

</androidx.drawerlayout.widget.DrawerLayout>

Step 4: Toolbar Activity

Add the below code inside your activity OnCreate() method.

 Toolbar mToolbar = (Toolbar) findViewById(R.id.toolbar);
 setSupportActionBar(mToolbar); // Setting replace toolbar as the ActionBar

That’s it. Now run your program and see the output. A toolbar with menu icon and title will shown on the top of your app.


Donate to support writers


You may interest on the following topics:

Firebase Email and Password registration for Android App

Please Share On:

In this tutorial, I am going to show you how can you use a fireballs database to register user email and password. Android firebase is very easy to apply in your app, you just need to follow my process. Let’s begin.

Step 1: Create UIUearear

Open a new project or existing project with a registration form on it. See an example of registration form I created in android register.xml file

Now, below is my register.xml source code which will create above UI interface.

<?xml version="1.0" encoding="utf-8"?>

<RelativeLayout xmlns:android="http://schemas.android.com/apk/res/android"
    android:layout_width="match_parent"
    android:layout_height="match_parent"
    android:id="@+id/relativeLayout"
    xmlns:ads="http://schemas.android.com/apk/res-auto"
    android:background="@color/midnightBlue"
    android:paddingLeft="5dp"
    android:paddingRight="5dp"
    android:layout_gravity="center_vertical">


    <ProgressBar
        android:id="@+id/progressBar"
        style="?android:attr/progressBarStyleHorizontal"
        android:layout_width="wrap_content"
        android:layout_height="wrap_content"
        android:visibility="invisible"
        android:layout_alignParentStart="true"
        android:layout_alignParentEnd="true" />

    <TextView
        android:id="@+id/txtRegisterYourAccount"
        android:layout_width="match_parent"
        android:layout_height="wrap_content"
        android:layout_below="@+id/progressBar"
        android:background="@color/background"
        android:gravity="center"
        android:text="@string/register_your_account"
        android:textColor="@color/colorPrimaryDark"
        android:textSize="30sp" />

    <androidx.core.widget.NestedScrollView
        android:layout_width="match_parent"
        android:layout_height="match_parent"
        android:background="@color/midnightBlue"
        android:layout_below="@+id/txtRegisterYourAccount"
        android:padding="5dp"
        android:layout_gravity="center_vertical">

        <RelativeLayout
            android:layout_width="match_parent"
            android:layout_height="wrap_content"
            android:paddingLeft="15dp"
            android:paddingStart="15dp"
            android:paddingRight="15dp"
            android:paddingEnd="15dp">

            <LinearLayout
                android:layout_width="match_parent"
                android:layout_height="wrap_content"
                android:id="@+id/linearlayout0"
                android:orientation="vertical"
                android:layout_marginTop="10dp">

                <TextView
                    android:id="@+id/txtName"
                    android:layout_width="match_parent"
                    android:layout_height="wrap_content"
                    android:text="@string/hint_name"
                    android:textColor="@color/white"
                    android:textSize="30sp"
                    android:labelFor="@id/ettxtName"/>

                <EditText
                    android:id="@+id/ettxtName"
                    android:layout_width="match_parent"
                    android:layout_height="wrap_content"
                    android:backgroundTint="@color/colorAccent"
                    android:inputType="textPersonName"
                    android:autofillHints="@string/hint_name"
                    android:ems="10"
                    android:maxLines="1"
                    android:textColor="@color/white"
                    android:textSize="20sp"
                    android:layout_marginTop="10dp"/>
            </LinearLayout>

            <LinearLayout
                android:layout_width="match_parent"
                android:layout_height="wrap_content"
                android:id="@+id/linearlayout1"
                android:layout_below="@+id/linearlayout0"
                android:orientation="vertical"
                android:layout_marginTop="20dp">

                <TextView
                    android:id="@+id/txtEmail"
                    android:layout_width="match_parent"
                    android:layout_height="wrap_content"
                    android:text="@string/hint_email"
                    android:textColor="@color/white"
                    android:textSize="30sp"
                    android:labelFor="@id/ettxtEmail"/>

                <EditText
                    android:id="@+id/ettxtEmail"
                    android:layout_width="match_parent"
                    android:layout_height="wrap_content"
                    android:backgroundTint="@color/colorAccent"
                    android:inputType="textEmailAddress"
                    android:autofillHints="@string/hint_email"
                    android:ems="10"
                    android:maxLines="1"
                    android:textColor="@color/white"
                    android:textSize="20sp"
                    android:layout_marginTop="10dp"/>
            </LinearLayout>

            <LinearLayout
                android:id="@+id/linearlayout2"
                android:layout_width="match_parent"
                android:layout_height="wrap_content"
                android:orientation="vertical"
                android:layout_marginTop="20dp"
                android:layout_below="@+id/linearlayout1"
                android:textColor="@color/white"
                android:textSize="40sp">


                <TextView
                    android:id="@+id/txtPassword"
                    android:layout_width="match_parent"
                    android:layout_height="wrap_content"
                    android:text="@string/hint_password"
                    android:textColor="@color/white"
                    android:textSize="30sp"
                    android:labelFor="@id/ettxtPassword"/>

                <EditText
                    android:id="@+id/ettxtPassword"
                    android:layout_width="match_parent"
                    android:layout_height="wrap_content"
                    android:backgroundTint="@color/colorAccent"
                    android:inputType="textPassword"
                    android:autofillHints="@string/hint_password"
                    android:maxLines="1"
                    android:ems="10"
                    android:textColor="@color/white"
                    android:textSize="20sp"
                    android:layout_marginTop="10dp"/>
            </LinearLayout>

            <LinearLayout
                android:id="@+id/linearlayout3"
                android:layout_width="match_parent"
                android:layout_height="wrap_content"
                android:orientation="vertical"
                android:layout_marginTop="20dp"
                android:layout_below="@+id/linearlayout2"
                android:textColor="@color/white"
                android:textSize="40sp">


                <TextView
                    android:id="@+id/txtConfirmPassword"
                    android:layout_width="match_parent"
                    android:layout_height="wrap_content"
                    android:text="@string/hint_confirm_password"
                    android:textColor="@color/white"
                    android:textSize="30sp"
                    android:labelFor="@id/ettxtConfirmPassword"/>

                <EditText
                    android:id="@+id/ettxtConfirmPassword"
                    android:layout_width="match_parent"
                    android:layout_height="wrap_content"
                    android:backgroundTint="@color/colorAccent"
                    android:inputType="textPassword"
                    android:autofillHints="@string/hint_confirm_password"
                    android:maxLines="1"
                    android:ems="10"
                    android:textColor="@color/white"
                    android:textSize="20sp"
                    android:layout_marginTop="20dp"/>
            </LinearLayout>

            <Button
                android:id="@+id/btnRegister"
                android:layout_width="match_parent"
                android:layout_height="wrap_content"
                android:layout_below="@+id/linearlayout3"
                android:layout_marginTop="10dp"
                android:text="@string/register"
                android:textColor="@color/white"
                android:textSize="35sp"
                android:textStyle="bold"
                android:background="@color/green"/>

            <TextView
                android:id="@+id/txtAlreadyAMember"
                android:layout_width="match_parent"
                android:layout_height="wrap_content"
                android:layout_below="@+id/btnRegister"
                android:gravity="center"
                android:text="@string/already_a_member"
                android:textColor="@color/white"
                android:textSize="20sp"
                android:layout_marginTop="20dp"/>
        </RelativeLayout>

    </androidx.core.widget.NestedScrollView>

    <com.google.android.gms.ads.AdView
        android:id="@+id/adView"
        android:layout_width="match_parent"
        android:layout_height="wrap_content"
        ads:adSize="BANNER"
        ads:adUnitId="@string/banner_ad_unit_id"
        android:layout_alignParentBottom="true">
    </com.google.android.gms.ads.AdView>

</RelativeLayout>

Color.xml

Here are a list of color I use in my project. Some of them are not used in this project. I am just showing you how to use color in your android project.

<?xml version="1.0" encoding="utf-8"?>
<resources>
    <color name="colorPrimary">#6200EE</color>
    <color name="colorPrimaryDark">#3700B3</color>
    <color name="colorAccent">#03DAC5</color>
    <color name="background">#CED6E0</color>
    <color name="white">#ffffff</color>
    <color name="black">#000000</color>
    <color name="ufoGreen">#26de81</color>
    <color name="green">#009432</color>
    <color name="watermelonRed">#EB3B5A</color>
    <color name="blue">#4B6584</color>
    <color name="midnightBlue">#2c3e50</color>
</resources>

strings.xml

<resources>
    <string name="hint_name">Name</string>
    <string name="hint_email">Email</string>
    <string name="hint_password">Password</string>
    <string name="hint_confirm_password">Confirm Password</string>
    <string name="login">Login</string>
    <string name="logout">Logout</string>
    <string name="register_your_account">Register Your Account</string>
    <string name="register">Register</string>
    <string name="noaccount">No account yet? Create One</string>
    <string name="already_a_member">Already a member? Login</string>
</resources>

Now, the firebase actual registration process starts from here after you have designed your registration UI interface.

Step 2: Connect Firebase

To connect firebase to your android project. Open your project and click Tools -> Firebase

The firebase wizard window will open. Select Authentication from the list and follow the step to connect firebase to your project.

Click connect to firebase on step 1. Here is an image after firebase connected to your project.

Step 3: Add Firebase Authentication to your app

To add firebase authentication to your app, login into your firebase console (http://console.firebase.google.com/) add your app in firebase console.

Open your newly added project and click “Authentication – Signin method and enable Email/Password“.

Now, you are ready to do coding that do registration using email and password in your firebase console. Make sure, if you have not provide internet permission yet, please do first in your manifest.xml.

<uses-permission android:name="android.permission.INTERNET" />

Add the above line in your manifest.xml.

Step 4: Registration Coding

Now, the last step is to write some coding that register your user entered data into firebase and create an account. When an user click register button, all entered data should be enter into firebase account. We also do some validation check like empty fields, invalide email, password length and so on.

Here is a final code of register.java

package com.elsebazaar.bottlecollections;

import android.content.Intent;
import android.os.Bundle;
import android.renderscript.Script;
import android.text.TextUtils;
import android.view.View;
import android.widget.Button;
import android.widget.EditText;
import android.widget.ProgressBar;
import android.widget.TextView;
import android.widget.Toast;

import androidx.annotation.NonNull;

import com.google.android.gms.tasks.OnCompleteListener;
import com.google.android.gms.tasks.Task;
import com.google.android.material.snackbar.Snackbar;
import com.google.firebase.auth.AuthResult;
import com.google.firebase.auth.FirebaseAuth;
import com.google.firebase.auth.FirebaseUser;

public class Register extends MainActivity implements View.OnClickListener {

    ProgressBar progressBar;
    EditText mName, mEmail, mPassword, mConfirmPassword;

    Button btnregister;
    TextView txtalreadyamember;
    Snackbar snackbar;

    FirebaseAuth fAuth;

    @Override
    protected void onCreate(Bundle savedInstanceState) {
        super.onCreate(savedInstanceState);
        setContentView(R.layout.register);

        progressBar = findViewById(R.id.progressBar);

        mName = findViewById(R.id.ettxtName);
        mEmail = findViewById(R.id.ettxtEmail);
        mPassword = findViewById(R.id.ettxtPassword);
        mConfirmPassword = findViewById(R.id.ettxtConfirmPassword);
        btnregister = findViewById(R.id.btnRegister);
        txtalreadyamember = findViewById(R.id.txtAlreadyAMember);

        fAuth = FirebaseAuth.getInstance();

        initListeners();
    }

    private void initListeners(){
        btnregister.setOnClickListener(this);
        txtalreadyamember.setOnClickListener(this);
   }

    /**
     * This implemented method is to listen to the click on view
     *
     * @param v
     */
    @Override
    public void onClick(View v) {
        switch (v.getId()) {
            case R.id.btnRegister:
                String name = mName.getText().toString().trim();
                String email = mEmail.getText().toString().trim();
                String password = mPassword.getText().toString().trim();
                String confirmpassword = mConfirmPassword.getText().toString().trim();

                //check whether name is empty or not
                if(TextUtils.isEmpty(name)){
                    mName.setError("Name is required");
                    return;
                }

                //check whether email address is empty or not
                if(TextUtils.isEmpty(email)){
                    mEmail.setError("Email Address is required");
                    return;
                }

                //check email address pattern is correct or not
                if (isEmailValid(email)){
                    mEmail.setError("Email Address is invalid");
                    return;
                }

                //check whether password is empty or not
                if(TextUtils.isEmpty(password)){
                    mPassword.setError(" Password is required");
                    return;
                }

                //check whether the password is less than 6 characters?
                if(password.length() < 6){
                    mPassword.setError("Password must be >= 6 characters");
                    return;
                }

                //check whether password and confirm password are match or not
                if(!password.equals(confirmpassword)){
                    mConfirmPassword.setError("Password does not match");
                    return;
                }

                progressBar.setVisibility(View.VISIBLE);

                //Register the user in firebase
                fAuth.createUserWithEmailAndPassword(email,password).addOnCompleteListener(new OnCompleteListener<AuthResult>() {
                    @Override
                    public void onComplete(@NonNull Task<AuthResult> task) {
                        if (task.isSuccessful()){
                            FirebaseUser user = fAuth.getCurrentUser();
                            updateUI(user);
                            Toast.makeText(Register.this,"Account Created",Toast.LENGTH_SHORT).show();
                            startActivity(new Intent(getApplicationContext(),Dashboard.class));
                        }
                        else{
                            Toast.makeText(Register.this,"Error Occured" + task.getException(),Toast.LENGTH_SHORT).show();
                            updateUI(null);
                            progressBar.setVisibility(View.INVISIBLE);
                        }
                    }
                });

                //Call function to empty All EditText
                emptyInputEditText();
                break;

            case R.id.txtAlreadyAMember:
                Intent intent = new Intent(Register.this, MainActivity.class);
                startActivity(intent);
                finish();
                break;
        }
    }

    /**
     * This method is to empty all input edit text
     */
    private void emptyInputEditText() {
        mName.setText(null);
        mEmail.setText(null);
        mPassword.setText(null);
        mConfirmPassword.setText(null);
    }

    //check email address pattern
    boolean isEmailValid(CharSequence email) {
        return !android.util.Patterns.EMAIL_ADDRESS.matcher(email).matches();
    }

    public void onStart(){
        super.onStart();
        //check if user is signed in and update UI accordingly
        FirebaseUser currentUser = fAuth.getCurrentUser();
        updateUI(currentUser);
    }

    private void updateUI(FirebaseUser currentUser) {
    }

}


That’s it. Run your project and fill the registration form. You will see a new account is created in your firebase console users list.


Donate to support writers


You may interest on the following topics:

Copyright @2023. All Right Reserved.


Social media & sharing icons powered by UltimatelySocial